Sometimes you may notice that your location on Google Maps is inaccurate or not determined at all (the blue dot is not shown). This article discusses how to troubleshoot such problems.
Note. More accurate location will help improve search results.
How to find out where you are
- Open the Google Maps application on your iPhone or iPad.
- In the place where you are, a blue dot will appear. If not, click on the target icon in the lower right corner of the screen.
How Maps determine where you are?
Location is determined by the following data:
- GPS Signal from the satellite (accuracy - up to several meters).
-
Wi-Fi. The closest source of wireless network.
-
Cell Tower. The place to connect to the cellular network (accuracy - up to several kilometers).
How to enable geolocation
Do the following:
-
Open the Settings app on your iPhone or iPad.
-
Click Privacy next to Geolocation Services.
-
Ensure that the Geolocation Services feature is enabled.
-
Scroll down and click Google Maps.
-
Select When using the program or Always.
How else can you improve the accuracy of geolocation
If your location is still incorrect, follow the steps below.
-
Turn on Wi-Fi
-
Open the Settings app on your iPhone or iPad.
-
Choose wifi.
-
Set the switch to ON.
Reboot your smartphone or tablet.
To do this, turn off and then turn on the device.
- Off. Press and hold the power button, and then select Next Turn off the power.
- Turning on. Press and hold the power button until the device turns on.
What does the blue dot mean
Your current location is indicated by a blue dot on the map. If Google Maps cannot determine exactly where you are currently, a blue circle will appear around the blue dot. The smaller the circle, the more accurate your coordinates.
Notes
-
If there is no blue dot or you see a gray dot, then Google Maps will not know where you are. The gray point marks the last saved location.
-
If there are obstacles between you and the cell tower, for example tall buildings, the location may not be precisely determined.
Sometimes you may notice that your location in the application is not determined accurately or is not determined at all (the blue dot is not shown). This article discusses how to troubleshoot such problems.
Note. More accurate location will help improve search results.
How to find out where you are
- Open the Google Maps application on your Android device.
- In the place where you are, a blue dot will appear. If not, tap the target icon Location at the bottom of the screen.
How Maps determine where you are?
Location is determined by the following data:
-
GPS Signal from the satellite (accuracy - up to 20 meters). Note. If you are in the building or in the subway, the data may not be specified accurately.
-
Wi-Fi. The closest source of wireless network.
-
Cell Tower. The place to connect to the cellular network (accuracy - up to several kilometers).
How to increase the accuracy of geolocation
Do the following:
- Open the Settings app on your Android device.
- Select Location.
- Set the switch to ON.
- Select Mode Next For all sources.
How else can you improve the accuracy of geolocation
If your location is still incorrect, follow the steps below.
Turn on Wi-Fi
- Open the Settings app on your Android device.
- Choose Wi-Fi.
- Set the switch to ON.
Reboot your smartphone or tablet
To do this, turn off and then turn on the device.
- Off Press and hold the power button further Turn off the power.
- Turning on. Press and hold the power button until the device turns on.
Calibrate compass
If the beam from the blue point on the map is too wide or indicates the wrong direction, you need to calibrate the compass.
-
Open the Google Maps Google Maps application on your Android device.
-
Several times draw a figure eight in the air until the compass is calibrated.
- After calibration, the beam will become narrow and point in the right direction.
What does the blue dot mean
Your current location is indicated by a blue dot on the map. If Google Maps cannot determine exactly where you are currently, a blue circle will appear around the blue dot. The smaller the circle, the more accurate your coordinates.
Notes
-
If there is no blue dot or you see a gray dot, then Google Maps will not know where you are. The gray point marks the last saved location.
-
If there are obstacles between you and the cell tower, for example tall buildings, the location may not be precisely determined.
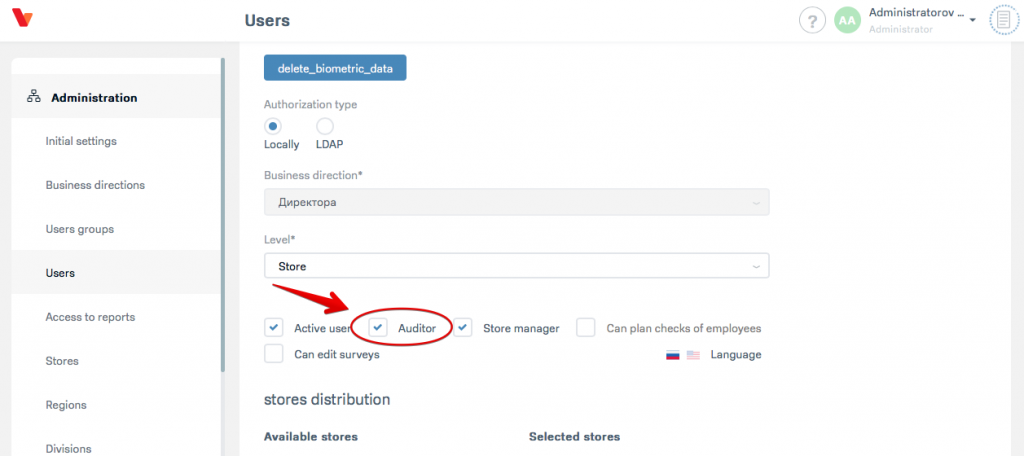
If the above problem occurs, you need to log in as Administrator in the QVALON and assign the user the role of Inspector.
To download the Retail Audit application, you need to open the download page:
For Android — soon
For iOS — https://apps.apple.com/ru/app/qvalon-retail-audit-system/id1109448122?l=en
Allow the application to install when prompted,
Open Settings-> Basic-> Device Management-> Mobile Dimension LLC [or any other application provider] -> Trust,
If you need to check the supplier, then click on the word "check"
Launch the application from the main screen.
If the above problem occurs, you should:
-
Check on the device whether the date, time, time zone for the given region are correct.
-
If the date, time, time zone for this region are correct - you need to check the version of QVALON on the device. Update it if not relevant (described in the "General" section - "How to download an application on Android and iPhone"
- Check whether the device works on the Internet (it is necessary to synchronize data in QVALON). To do this, go to several sites and click on the links.
- If the sites are loading, then the Internet may be working, but it is not stable and the QVALON synchronization cannot pass correctly. In this case, you need to synchronize via Wi-Fi (after turning off the mobile Internet).
- If all of the above is done and the problem persists, you need to check the version of QVALON. Update it, if not relevant (described in the article How to download an application on Android and iPhone).
1. On the device, open the file manager (My files). Choose Device Storage. If an additional USB flash drive is installed on the device, a similar one will be released (if there is no USB flash drive, it will immediately go to Device Storage).
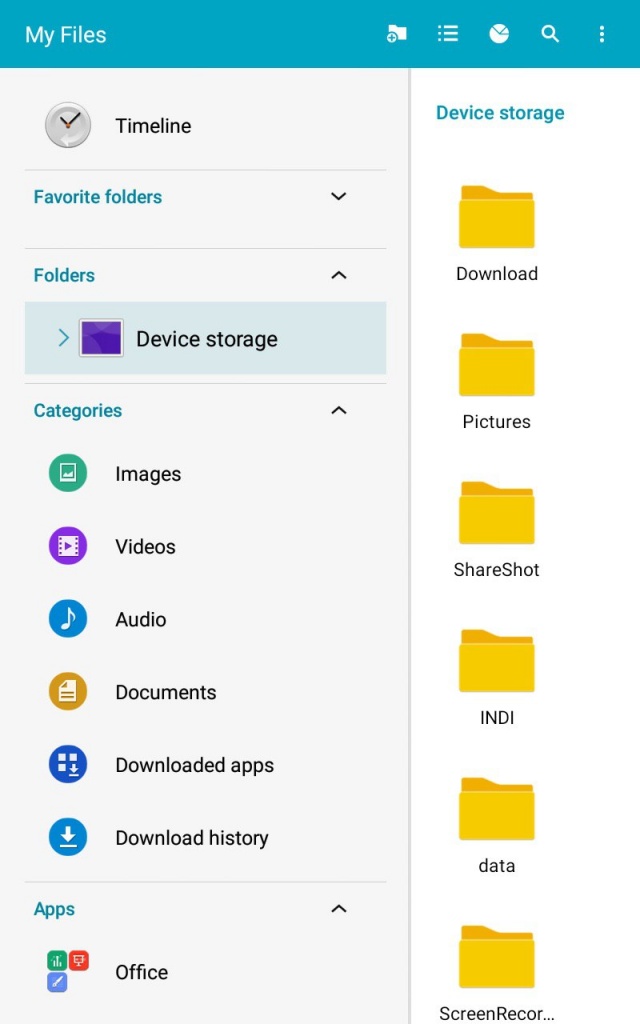
2. Find the Download folder, and WRS in it. It will contain files of type.
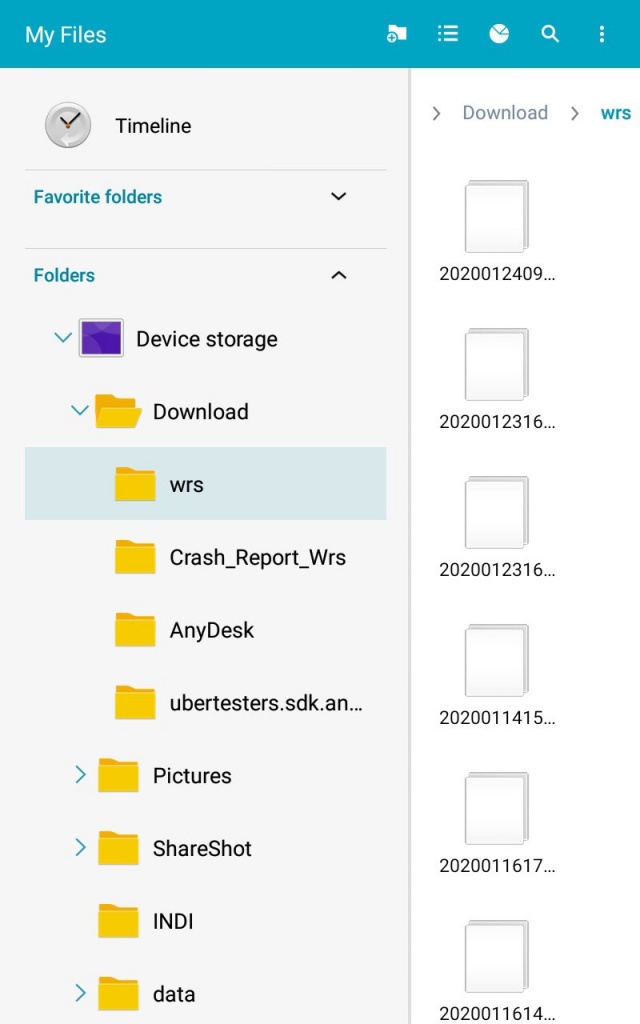
3. Select some of the newest files by date (or all the files in the folder), attach them to the ticket on the problem with QVALON.
To remove QVALON logs on Android is necessary (items may differ on different devices, the main thing is to find the Download folder and in it the Wrs folder).
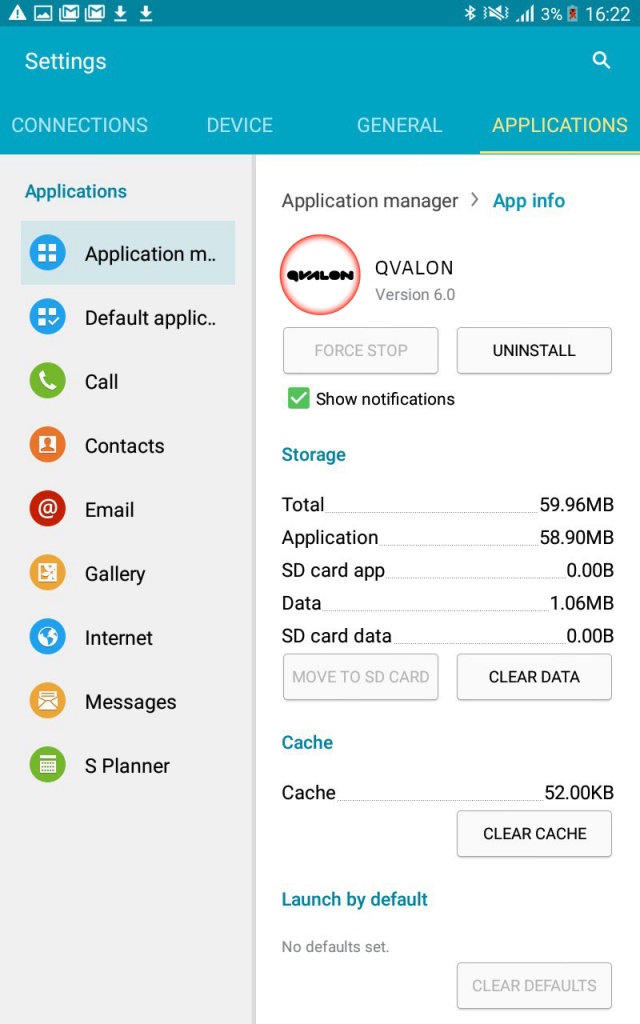
The data cleaning procedure or the QVALON cache on Android is performed when there is a suspicion that the application is not working correctly.
Clearing the cache deletes the most frequently used data, temporary files, etc.
Data cleansing leads to a complete erasure of information in the QVALON i.e. recovery at the time of its installation.
Initially it is recommended to clear the cache. If this does not help, then clear the data, because the cache in this case is also clear.
To clean the need (on different models may vary):
1. Select Settings.
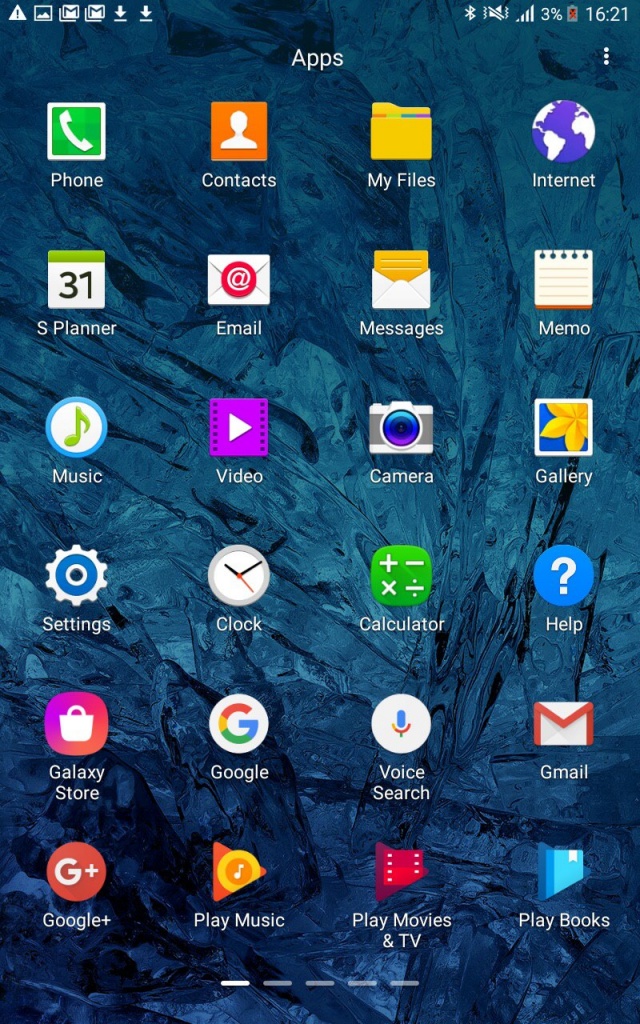
3. Select Application Manager, Find QVALON and click on it. First select Clear cache, if it did not help – Clear data.
User access rights are configured through:
- Choosing a business direction.
- Level selection.
- Specify additional parameters (checkboxes).
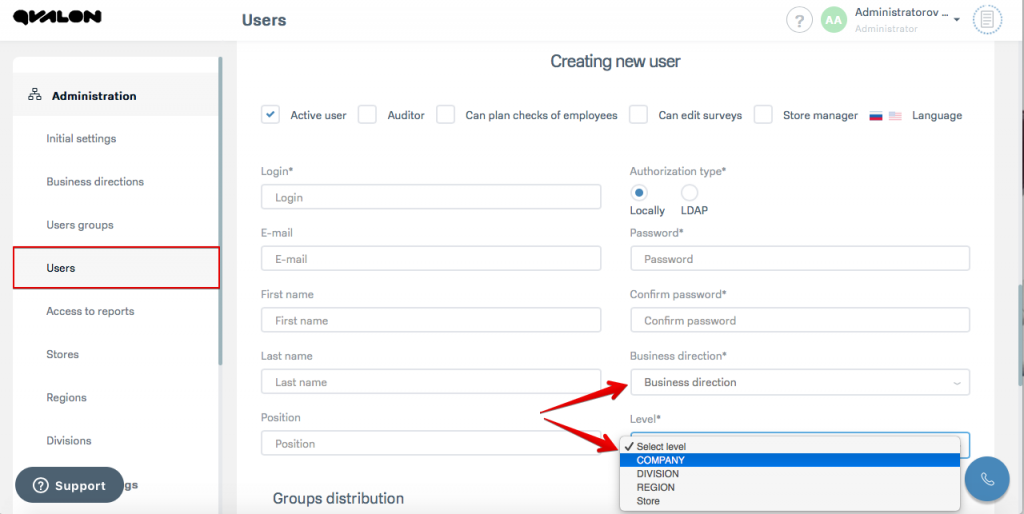
When selecting the Division, Region, or Store levels, the user must assign divisions / regions / stores with which he will be associated.
When selecting the "Company" level, the user will have access to information throughout the network.
Hierarchy of rights:
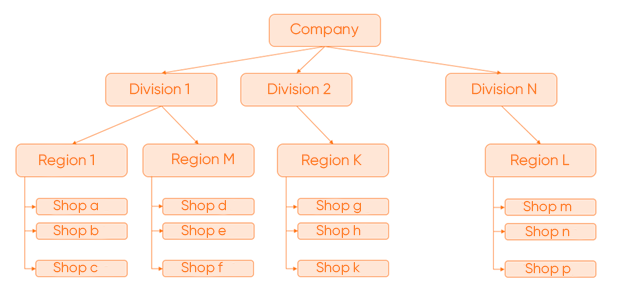
- Store level - stores are assigned. He has the right to check the store associated with it.
- Level "Region" - automatically activates the check-box "Checking", regions are assigned, it has the right to check and set tasks for all active stores in its associated regions. He is the director of the region (one or several).
- “Division” level - automatically activates the “Checking” check box, divisions are assigned, it has the right to check and assign tasks to all active stores of divisions attached to it OR assign tasks to all regional directors of its BN that belong to its division.
- The level of "Company" - he has the right to set tasks for all active stores and check them (if he has an active check box "Checker"); assign tasks to all directors of the regions of his business direction; assign tasks to all directors of his business direction divisions; set tasks for all the director of his business direction stores.
Rights affects:
1. Establishing tasks.
The user can start tasks only for users who have a lower level in the hierarchy (the Regional Director can start tasks only for directors of shops, etc.). Store manager cannot start tasks
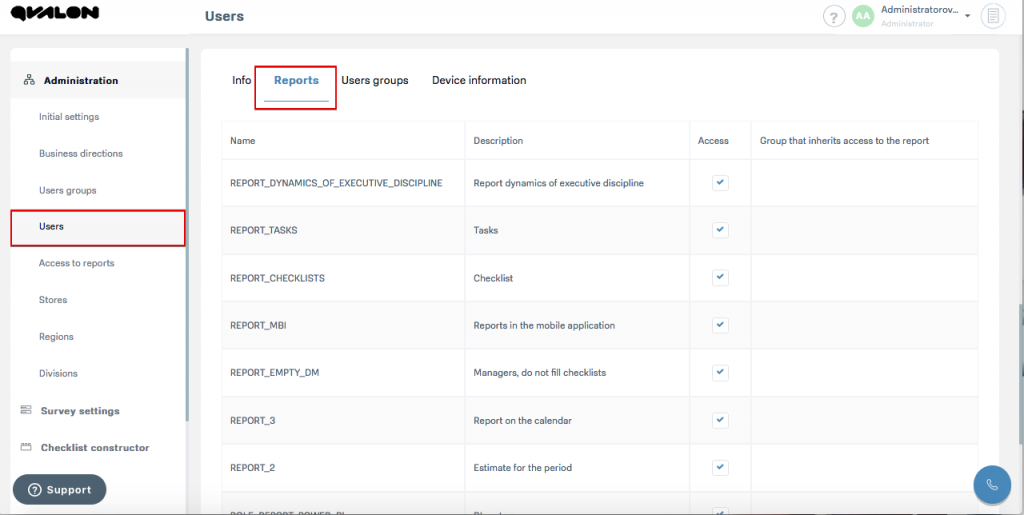
2. Reports.
Depending on the rights granted, the user will have access to a different set of reports.
Reports can be further customized in Administration — Users — Reports.
Advanced options (checkboxes).
The parameter "Can schedule employee checks" is responsible for the presence / absence of the field "Select user" in the checks calendar. In this window, the user can assign checks to those who have the same chosen business direction, as well as being equal in level or lower by one level (for example, the Division can assign to the division and region, but cannot to the store).
The "Checker" parameter is responsible for the possibility of assigning a user to the checkers in the store, as well as the ability to schedule checks (presence / absence of the "Calendar of checks" tab). Levels "Division" and "Region" by default "checking".
Putting down the Store Director will automatically fill the Store level and the Store Directors business line, as well as the Checker option.
If checks for users have become expired today, the probable reason for blocking checks is a change to 0 by checking Settings — Parameter — Days ago when you can send checks.
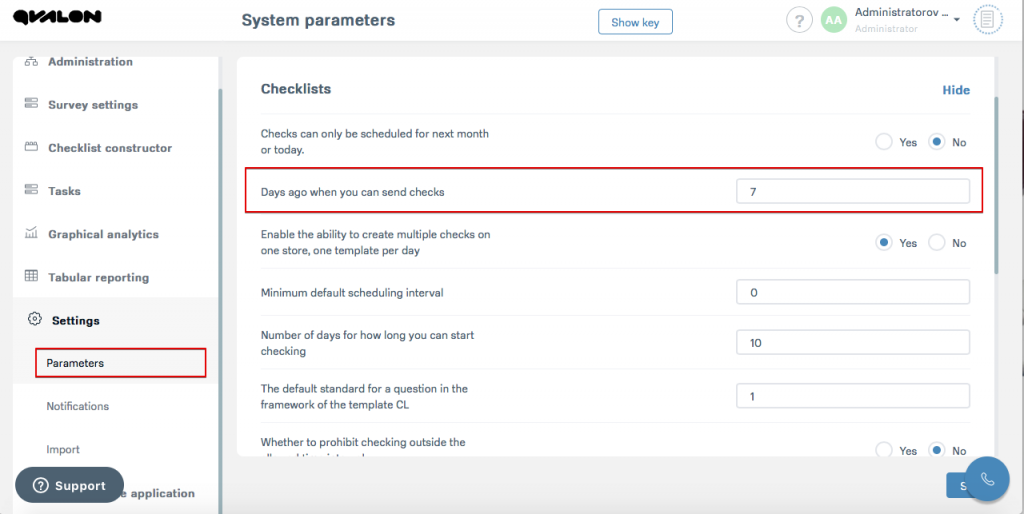
You must set a value other than 0.
To cancel a notification of the check, the user must check:
-
Go to Checklist constructor — Checklist templates.
-
Select the necessary checklist.
-
Go to the tab Notification send settings.
-
Put a marker on Only notes and remove from PDF and Excel.
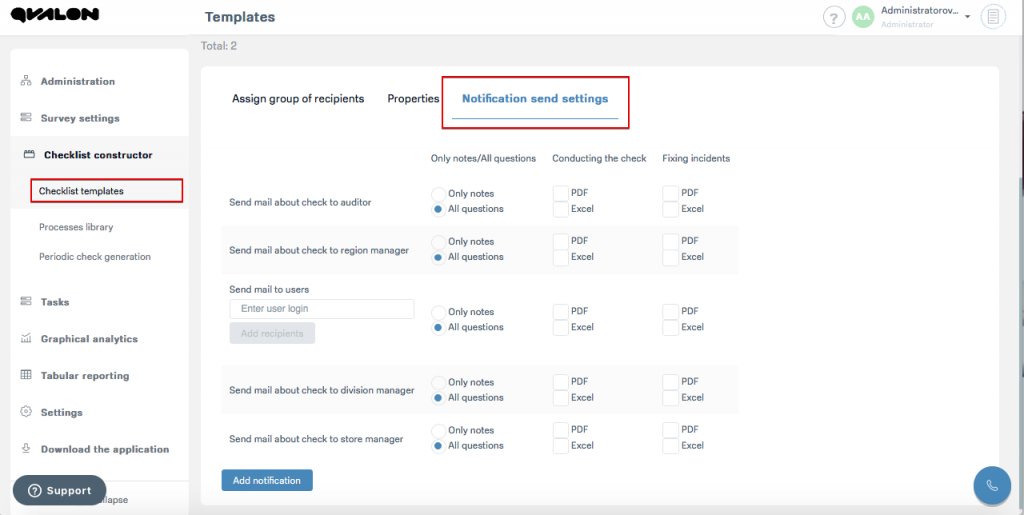
In the situation in the figure above, no letters of inspection will be sent to the division manager.
To assign checklists for store manager on a specific or every day you need:
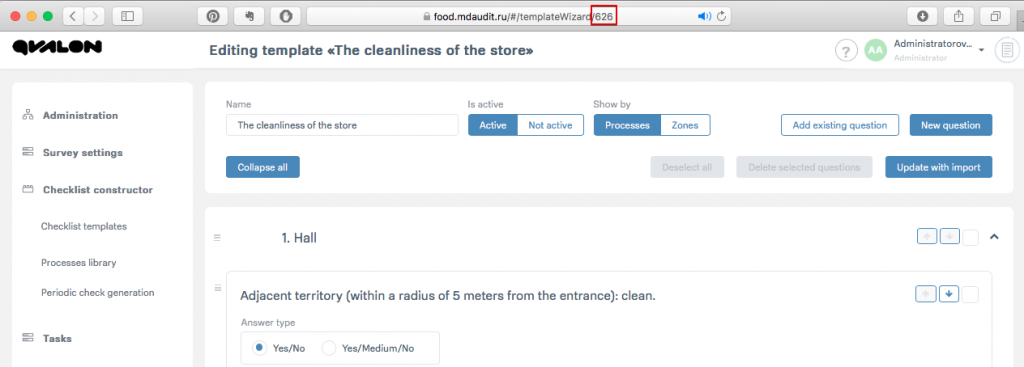
1. Find out the checklist number. Open the Checklist constructor — Checklist templates, select the desired checklist and click edit. The contents of the checklist. The last digits in the search bar will be the number of the checklist (in this case, 626).
2. Go to Settings — Parameters — Checklists for managers and enter comma-separated numbers in the desired line.
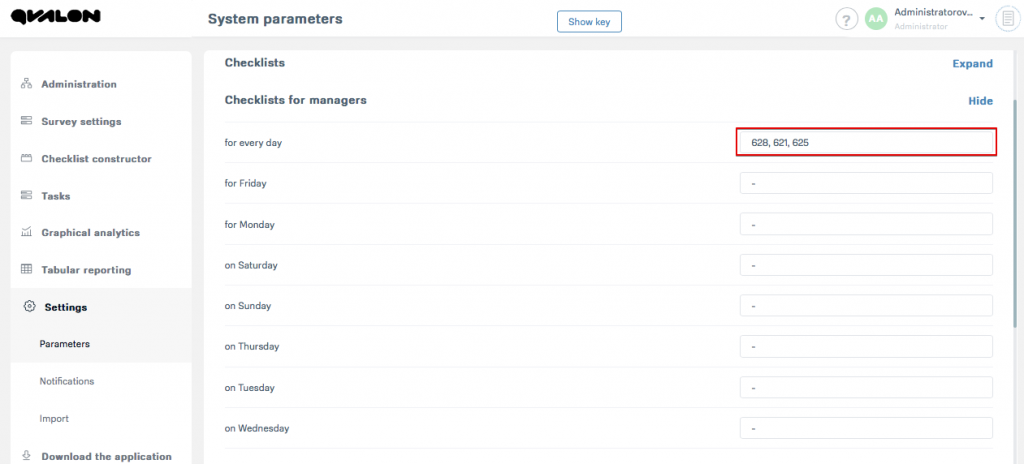
In this case, all store managers were assigned every day to perform checklists with numbers 628,621,625.
Question: Can a certain list of store manager assign other checklists for the day?
Answer: No, it is impossible. Planning is carried out immediately on all the store managers.
For the possibility of passing backdating checks, the Checklist option is the Number of days for how long you can start the checking.
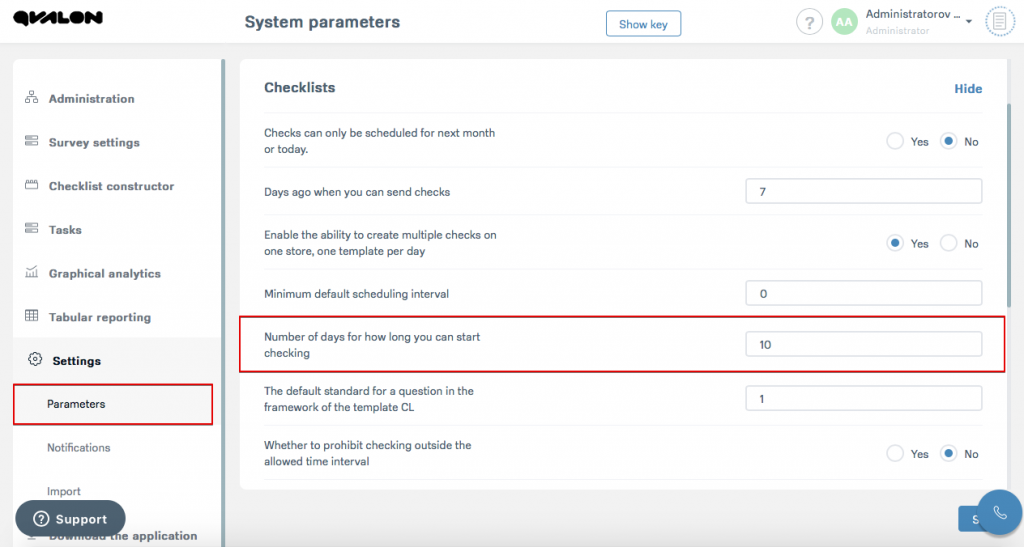
It is necessary to set the desired value.
For the ability to delete checklists by the author created N-days ago, the option Delete Checklists is the number of days ago when it can be deleted (options for deleting checklists are listed in Removing Checklists).
You need to set the desired number of days.
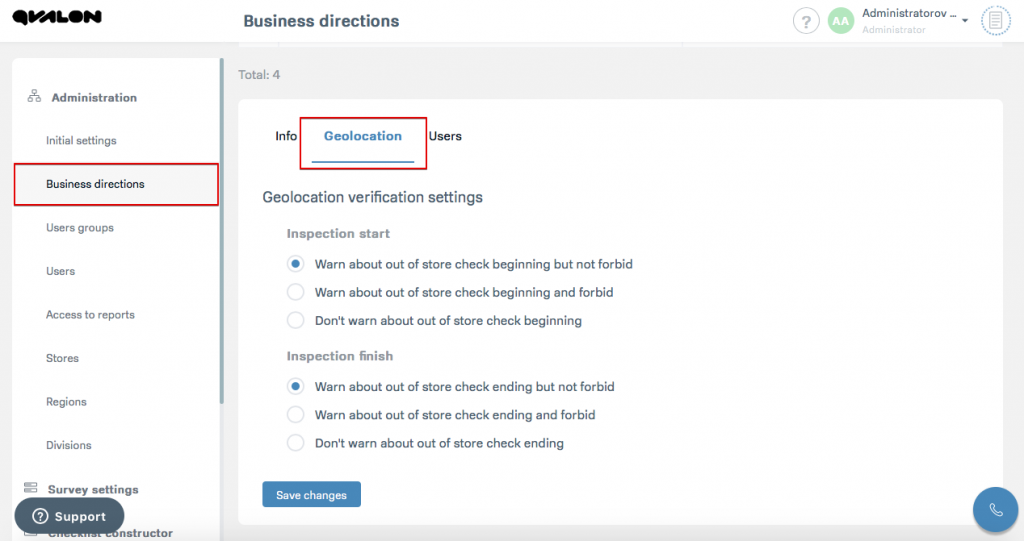
Geolocation is configured on the Business directions, further spreading the rules to users included in it.
To configure, you must log in as Administrator, go to Administration — Business directions. Select the desired business direction and on the geolocation tab, configure the required parameters.
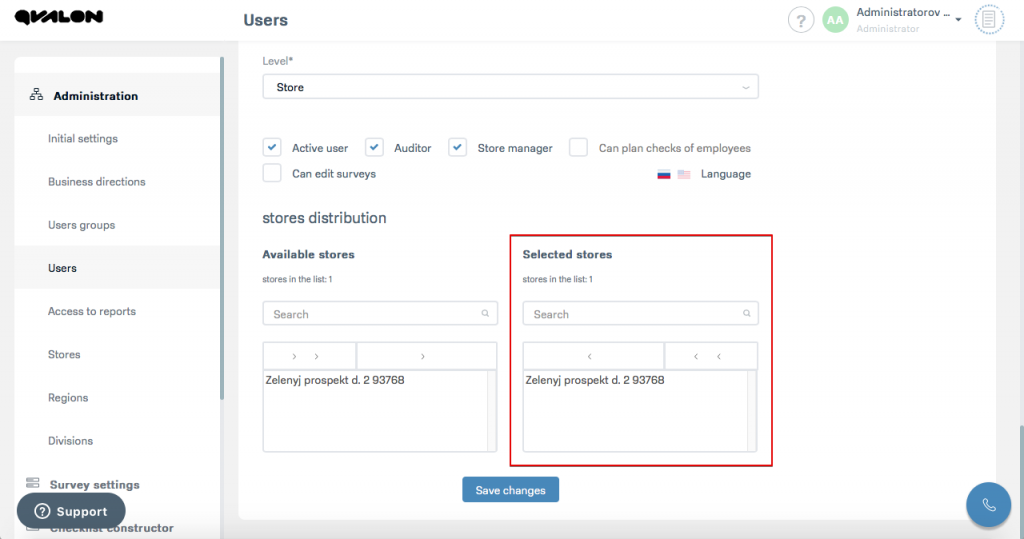
Shop is not displayed in the Checks calendar.

The reason is that the store is not associated with this user account.
You must log in as Administrator, go to menu Administration — Users. Find the right user and add the store to the selected stores.
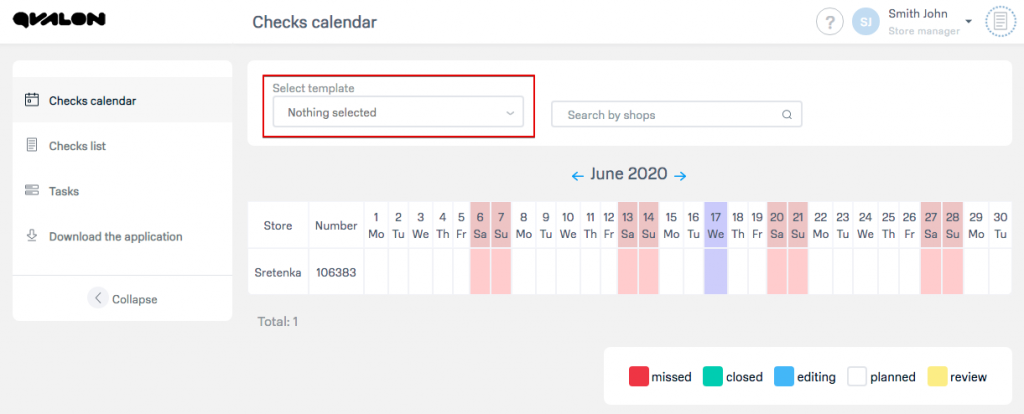
The checklist template is not displayed in the Select verification template checklist field:

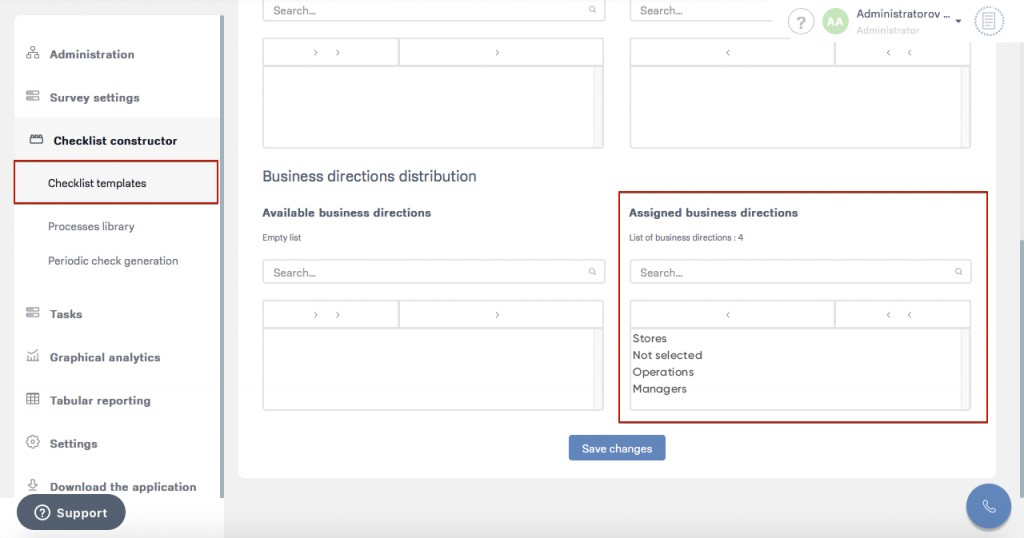
The reason is that there is no business direction in which the user data is added to the distribution of the business directions of the checklist template. It is necessary to log as the system administrator and add the necessary.
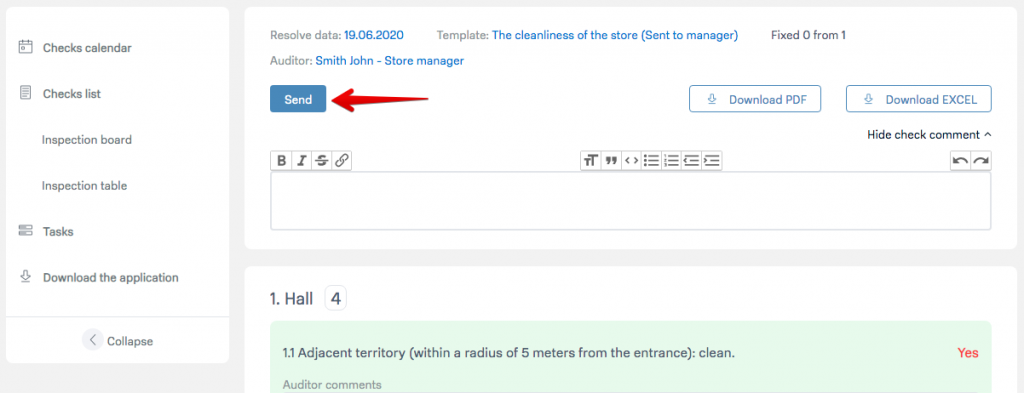
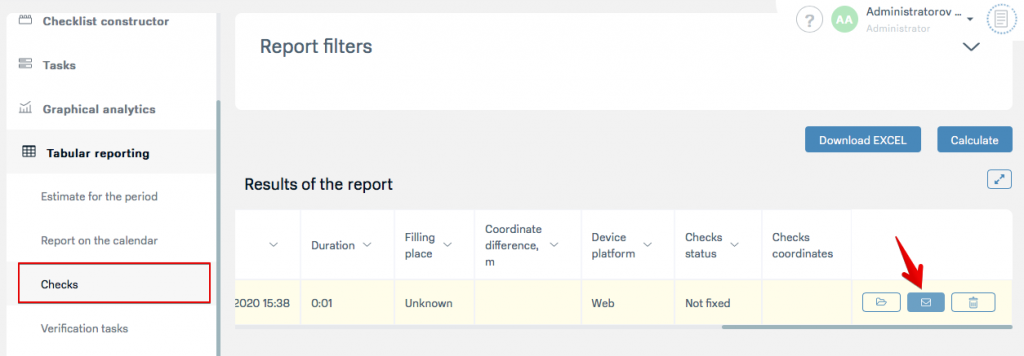
There are several options for sending notifications according to the rules of the checklist template notification settings:
1. Go to the list of checks - select the check - click to view. In the check itself, click Submit. Notification will be sent.
2. Log in as the system administrator, go to Tabular reporting — Checks. Select the required checks and click submit button.
To set up sending notifications on checklists, you need to log in as Administrator. Open Checklists constructor — Checklistemplates. Choose required checklist, and open tab Notification send settings.
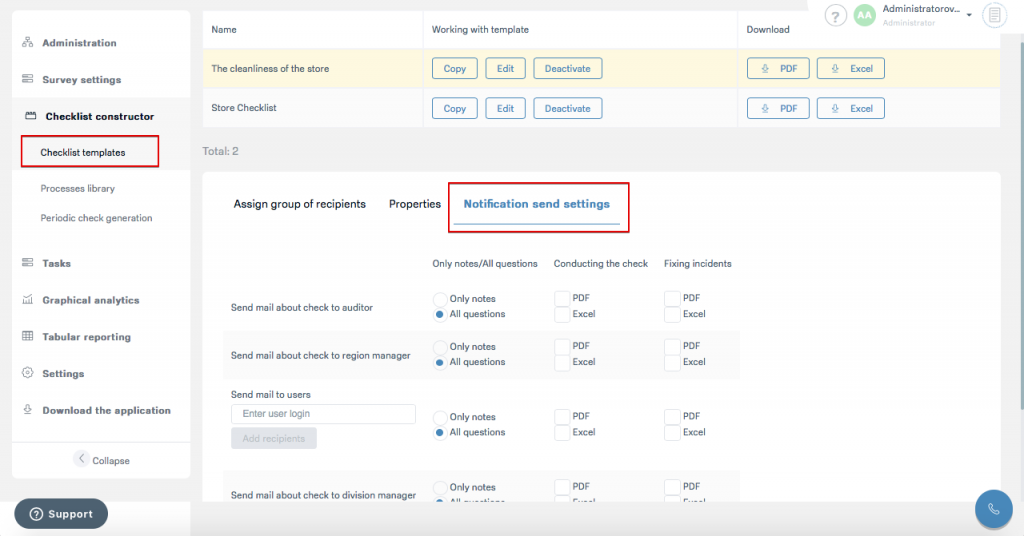
We select the necessary options presented in the screenshot above.
Since the usernames are specified in the mailing list, then when their email address (email) is changed, the newsletter will automatically arrive at the new address.
1. Go to the QVALON as an administrator.
2. Check if the user is a store director and a store is attached to it.
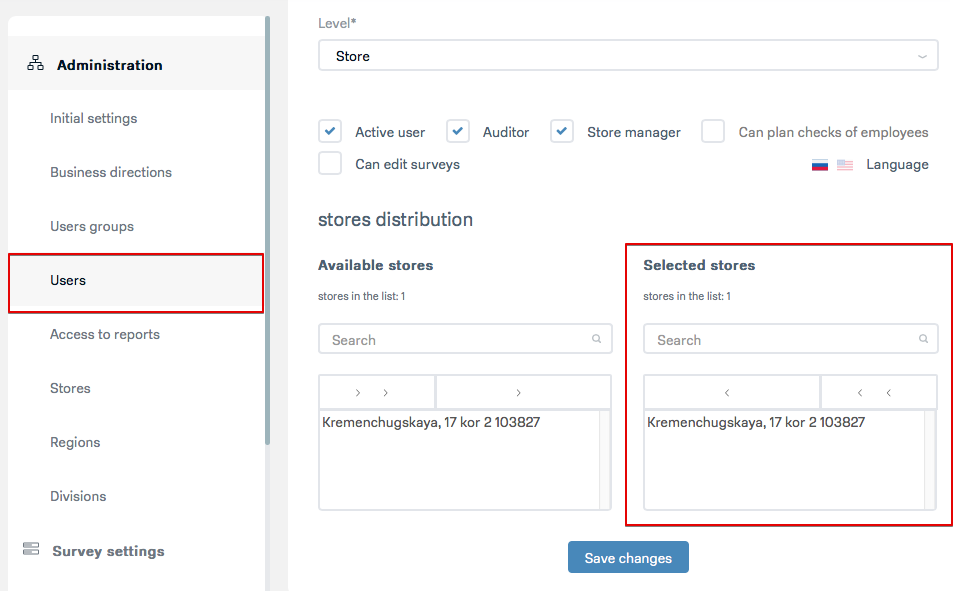
3. If the store is not displayed in the list of available - you need to check whether it is active. To do this, in the stores tab, remove the checkbox of the Active only filter and find the desired store.

We put him active.

4. We bind the store to the user. From this point on, new tasks will arrive (old ones need to be re-created).
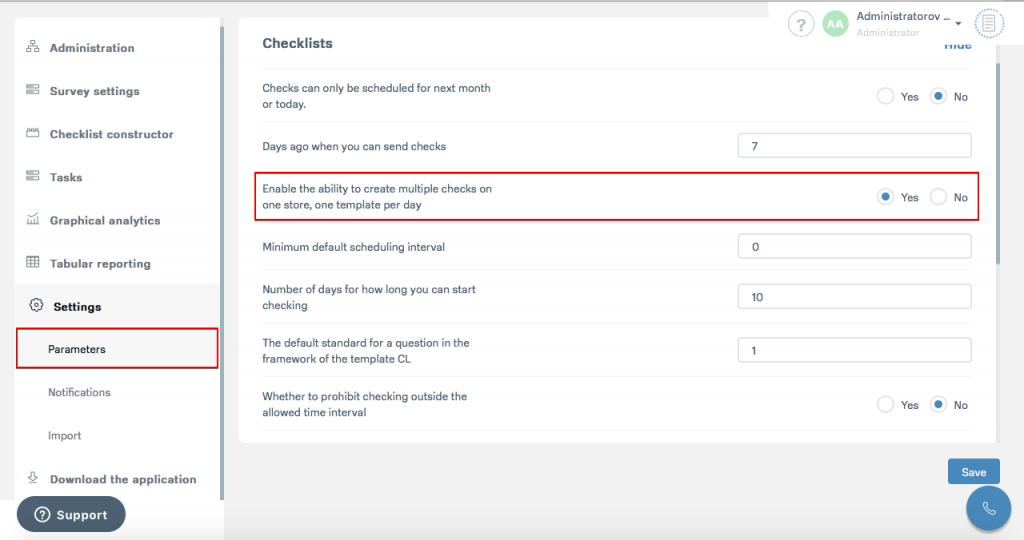
It is necessary to log in as Administrator in Settings — Parameters — Checklists. Enable the option Enable the ability to create multiple checks for one store on one template per day.
After that, you will receive an email with a confirmation of registration and a link to the system. Access is granted for a period of not more than 30 days and only for legal entities.
After the test period, access to the system will be blocked.
To work with QVALON, you must use Google Crome browser (you can download it at https://www.google.com/chrome/). In other browsers, the correct operation of the QVALON is not guaranteed - there may be a hang (as for example in Internet Explorer). System requirements are described under the link https://mdaudit.app/en/product/tech/.

The reason is that the director of the store has not checked Auditor. You must log in as Administrator in Administration — Users. Select the required user and put the checker sign on it, save the changes.
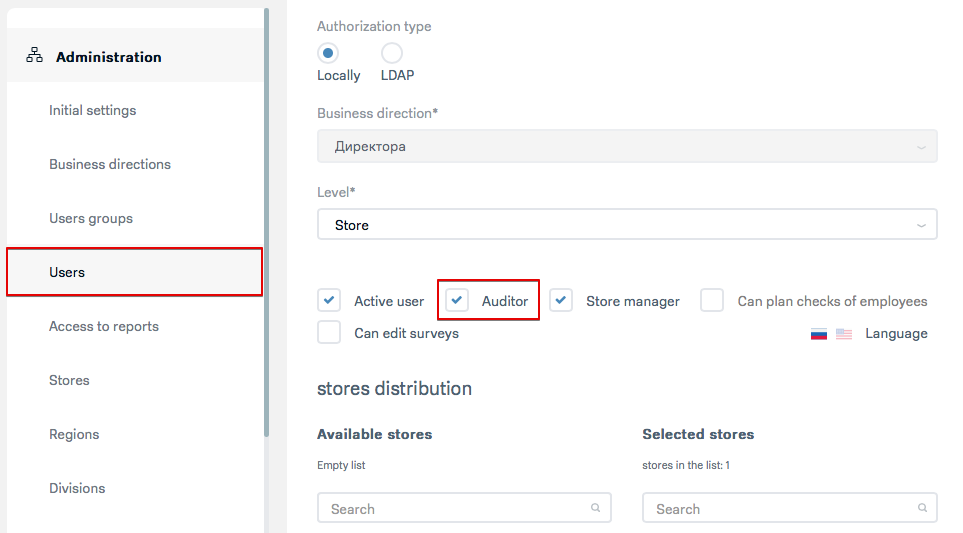
We log in as a user — the item Calendar check appeared.
To send logs you need to go to tab Moore and choose Settings.
Select the item Log management.
Select the item Send logs. If necessary, on this screen you can select Delete logs.
Enter the mail support@mdaudit.ru to send and click the "send arrow".